Tackling Timeline (step #3) Pin with purpose!
In step one, we talked about updated your facebook timeline cover image.
In step two, we went over how to customize & move around your tabs.
In step three, we’re going to talk about the importance of your news feed, how to pin with purpose, highlight posts, and talk about the new ‘contact’ through facebook feature (and what to do if you don’t want it!)
Be remarkable.
Even with all the changes to the layout of facebook pages, when it comes to fan engagement, the news feed still reigns. Stats show that the majority of facebook ‘activity’ takes place in ‘news feed mode.’
So, while you can have all sort of great things happening on custom tabs, if your fans don’t know about, they will just be sitting there looking pretty! Post status updates that get people commenting.
Ask a question. Ask for a thumbs up. Get opinions.
 As photographers, we obviously post a lot of photos from our sessions. But, we should remember to mix it up with other updates that encourage fan feedback. Or, when we post photos from sessions, include a question…or some reason for them to engage (other than offering some nice feedback of course!)
For example...”Had a wonderful newborn session in the studio. Loved the little baby fuzz on the ears.”
vs…
“Had a wonderful newborn session in the studio. Loved the little baby fuzz on the ears. What do you love most about newborns?”
Which do you think will get more responses?
Here’s a great post on some more ideas on how to keep your news feeds engaging.
Pin with Purpose.
A new feature on Timeline is the ability to ‘pin’ one of your posts to the top of the page.
How to do it? Simply click on the ‘pencil’ icon, and select ‘pin to top’
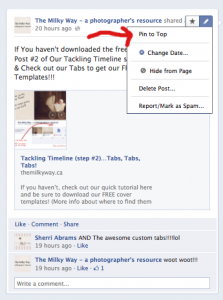 Your ‘pinned’ post will stay at the top of your page for 7 days (or until you ‘un-pin’ it).
When might you want to pin a post? Many reasons! Maybe you are running a promotion, and you want to ensure people will see it. Maybe you had a killer session, that you want to show off for a week.
Or, maybe, you want to drive people to one of your custom tabs??
Let’s say, for example, that you have set up a Welcome tab. Perhaps you are using this to drive to encourage ‘likes’ by offering a discount, or giveaway. Or, you just want to lead people to that particular message.
You can create a post, copy & paste the url from the ‘page’ you want to link to.
UPDATE!!! It would seem that the ‘thumbnail & link that is auto-generated will simply link back to your main page. So, keep the URL in your post and just add a message on top.
Such as, “Welcome to the Milky Way. Be sure to download your FREE timeline templates – simply click the link below!
Then, you pin this post to the top to ensure it is what they will see first in your news feed.
Highlight Your Favourites
The new timeline also lets you ‘showcase’ your favourite posts by using the highlight feature. This will spread your post across both columns.
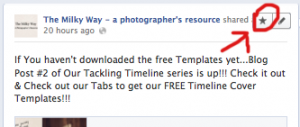
To highlight a post, simply click on the star.
 To illustrate, here is a shot of a post on my Milk & Honey facebook page as it looks when in default mode.
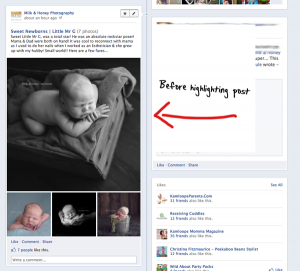 And after clicking the star to highlight it!
A few other tips!
Direct Message…or Not.
Timeline now allows people to message your business directly through the ‘message’ button found near the top of the page. However, if you do not want this feature, you can turn it off.
Go into your admin panel. Closer to the bottom of the options, you will see “Message” – with an option to take of the ‘check-box’, and remove the message feature.
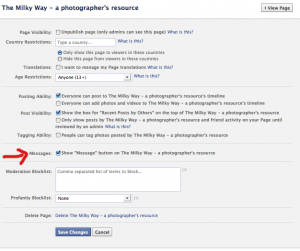 In this admin section, you also have the opportunity to remove the box found at the top right column, called ‘recent posts by others’
Build up your Timeline
You also can add in special dates to fill in your company timeline. Date company established. Important milestones. Your 100th session (or your 10th!) Made-up milestones. Whatever!
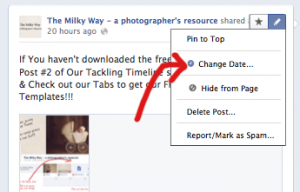
Simply create your post, then in the edit drop-down box (click the pencil on your post), choose the ‘change date’ option. And voila. Instant history! Add images to make your timeline visually interesting!
Next in our facebook series…how to use facebook to collect contact information and strategies to increase your number of fans (and how to use your fan base to effectively use facebook pay per click ads).
share the love
[Sassy_Social_Share]
2 Comments
Leave a Comment
related
Posts

I'm
Lisa DiGeso
I’m on a mission to create uplifting online experiences for photographers ready to elevate their art, their business and their mindset.(...and have fun along the way!)











Hi,
I just wanted to request that you do a post on natural lighting. I use studio lighting but your natural light is so inspiring. Looking forward to the maternity guide!
Thanks,
Melissa
Thanks, Lisa! Those are great tips. I’ve been terrible at doing this particular step of keeping fans engaged. 🙂