One of my biggest frustrations when I was first starting is that I did not know the distance between my subject and the background mattered just as much as the aperture I was using.
So I kept doing what everyone says to do. Open up the aperture. Shoot wider. Get more blur.
It helped a little. It never fully solved it.
You can shoot wide open at f1.8 and still have a messy, distracting background. If your subject is standing close to whatever is behind them, no aperture setting will fix that. The background is too close. There is not enough distance to create real separation.
Blur comes from distance, not just aperture. And once that clicked for me, everything changed.
Why Aperture Alone Does Not Fix a Busy Background in Photos
Aperture controls how much of the scene is in sharp focus. Open it up and the depth of field gets shallower. More of the background falls out of focus.
But aperture cannot create distance that does not exist.
If your subject is standing close to a fence, a wall, a line of trees, or a parked car, even f1.2 is not going to give you clean separation. The background is physically too close to the subject. There is not enough space between them for the blur to do its job.
This is why so many photographers open their aperture all the way and still wonder why the background looks cluttered. The aperture is not the problem. The positioning is.
Aperture is the finishing touch. Distance is the foundation.
How Distance Between Subject and Background Actually Works
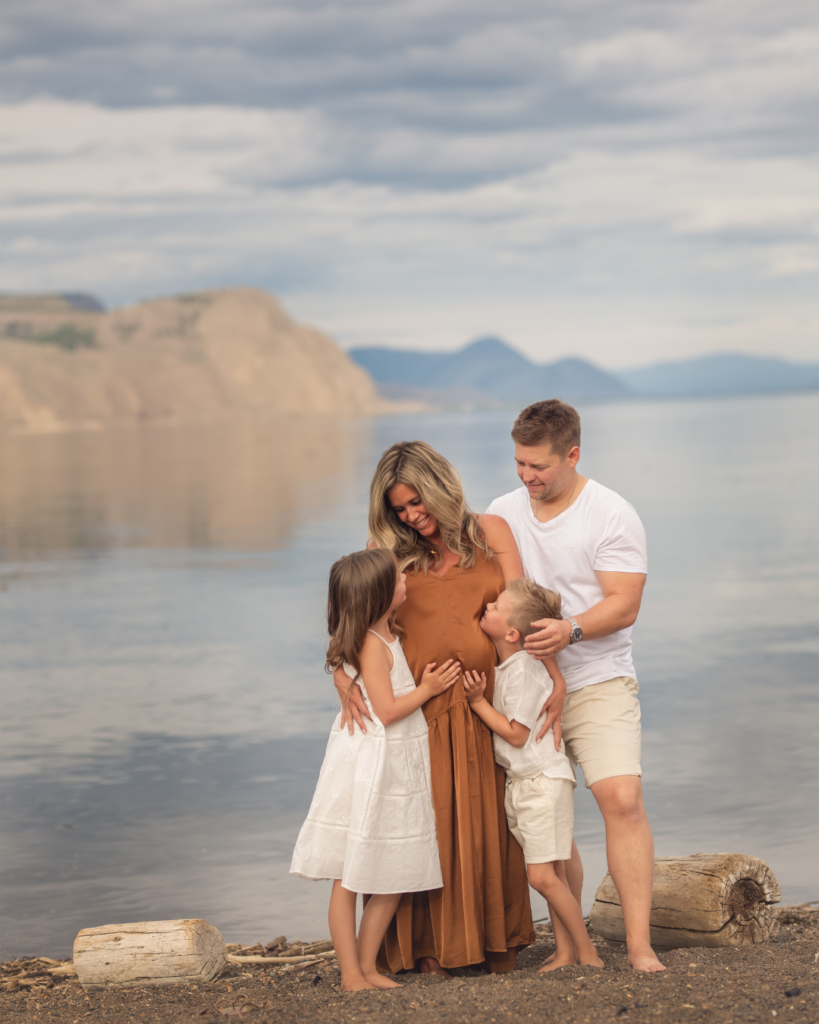
The further your subject is from the background, the more the background falls out of focus, regardless of what aperture you are using.
Think about it this way. If your subject is standing two feet from a fence, the fence is always going to compete for attention in the frame. Move your subject ten feet away from that same fence, and suddenly it softens, recedes, and stops being a distraction.
The background did not change. The distance did.
This means one of the most powerful things you can do at any outdoor session is move your clients forward, away from whatever is behind them, and back yourself up to maintain your framing. More space between subject and background equals cleaner images, every time.
How to Use Positioning to Clean Up Your Backgrounds
Because distance is the main lever here, how you position yourself and your clients matters more than any camera setting.
The first thing I look for when I arrive at a location is how much space I have to work with between where my clients will stand and what is behind them. A beautiful location with no depth to work with is a harder location than a simple field with room to spread out.
One thing I do every single session is rotate around my subjects rather than shooting from one fixed spot. I move left and right, higher and lower, in a loose semi-circle, and I watch what the background does as I move. Sometimes shifting one foot to the side removes a bright patch or a telephone pole completely.
The background changes every time you move. Use that.
I am also constantly repositioning clients during a session. Moving them further from whatever is behind them. Changing the angle to put more distance between them and a distracting element. These are not big dramatic moves. Sometimes it is just asking the family to take three steps forward.
What to Do When You Have Limited Space
Not every location gives you a lot of room to work with. Sometimes you are shooting in a backyard, a tight park, or somewhere with a clear boundary behind your subjects.
In those situations, angle becomes your best tool. Moving yourself to a different position, even slightly, changes what sits in the background completely. Getting lower can put the sky behind your subjects instead of a cluttered middle distance. Moving to the side can swap a busy background for a cleaner one without moving your clients at all.
You are always looking for the angle where the background has the least competition with your subjects. That is the shot.
A Note on Aperture for Group Photography
For full family groups, I start at f3.2 rather than shooting wide open. Families are rarely on the exact same focal plane. Kids lean forward, adults have different heights, people shift and sway. At f1.8 even small movement can take someone out of focus.
And because I have already solved the background problem with distance and positioning, I do not need to rely on a razor-thin aperture to get blur. The softness is already there from the distance. Aperture is just the final adjustment.
Two Questions to Ask Before You Touch the Aperture Dial
The next time your background looks busy in a photo, ask these two questions before you reach for your settings.
How much distance is there between my subject and the background, and can I increase it?
Can I move myself or my clients to an angle where the background is cleaner?
Those two things will do more to fix a busy background than any camera setting. Positioning first. Aperture after.
Frequently Asked Questions About Busy Backgrounds in Photos
Why does my background still look busy even when I shoot wide open?
Because aperture alone cannot compensate for a lack of distance. If your subject is standing close to the background, opening your aperture wider will not create enough separation to clean it up. Move your subject further from the background first.
What if I only have a small space to shoot in?
Work your angles. Moving yourself rather than your clients can change the background completely. Getting lower, moving to the side, or changing your position in relation to the light can all put a cleaner background behind your subjects without needing more physical space.
Does this apply to indoor photography too?
Yes. The same principle applies anywhere. Indoors, the distances are shorter, which is why backgrounds tend to look busier inside without deliberate effort. Put as much space as possible between your subjects and the wall or furniture behind them, and work the angles you have.
How do I know if a location has enough depth to work with?
When you arrive at a location, look for how much space exists behind where your clients will stand. You want room to move them forward and back yourself up. A wide open field, a long path, or a location with depth gives you the most to work with. A tight corner or a location with a wall close behind limits your options significantly.
Want to Go Deeper on Outdoor Photography and Location Choice
If you want to learn how to read a location before you ever raise your camera, how to find great light at any time of day, and how to lead every outdoor session with confidence, that is exactly what I teach inside Enlighten, my natural light photography course.
Enlighten – feel confident shooting outdoors in any light!
How to Shoot Outdoor Family Photography: The 5 L Method I Use Every Session
Join us for the Family Retreat and get ready to fall in love with your family sessions!
But start here. Distance first. Positioning second. Aperture after.